Knowing how to create a folder on a laptop is one of the basic computer skills every beginner should learn. It helps you arrange your documents, pictures, videos and other files so that you can find them easily whenever you need them.
For instance, if you use your laptop for schoolwork, business, office assignments or personal activities, keeping all your files in one place can make it difficult to locate a particular document.
Creating folders allows you to separate your files according to their purpose.
The good news is that you do not need special computer knowledge to create a folder. You can do it in a few simple steps.
What Is a Computer Folder?
A folder is a digital location on your computer where you can keep and organise files.
Think of it like a physical file folder in an office. Instead of keeping all your papers together, you arrange them in different folders according to their contents.
For example, you can create separate folders for:
- School documents
- Business records
- Pictures and videos
- Office assignments
- Personal documents
This makes it easier to organise your work and avoid losing track of important files.
Steps to Create a Folder on a Windows Laptop
Follow these simple instructions:
Step 1: Open File Explorer
Switch on your laptop and go to the desktop.
Look for the File Explorer icon, which usually looks like a yellow folder on the taskbar. Click on it to open.
You can also press the Windows key and E together on your keyboard.
Step 2: Choose Where You Want the Folder
After opening File Explorer, select the location where you want to keep your new folder.
For beginners, the Desktop or Documents folder is a good place to start.
Click on your preferred location.

Step 3: Create a New Folder
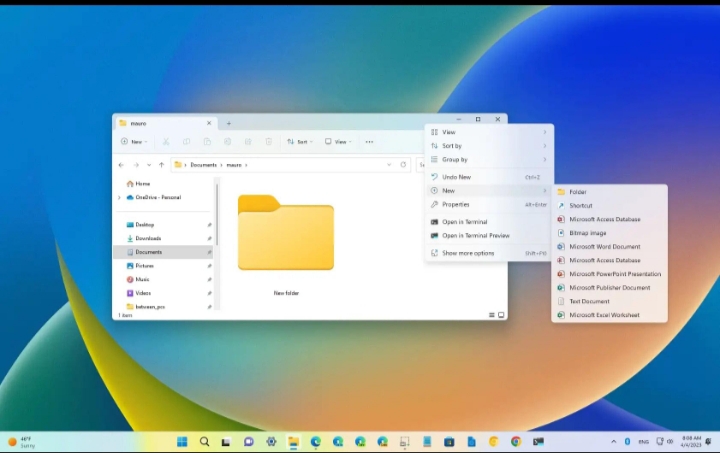
Once you have opened your preferred location, right-click on an empty space.
A small menu will appear on your screen.
Move your mouse to New and then select Folder.
A new folder will appear, waiting for you to give it a name.
Step 4: Give Your Folder a Name
Type the name you want to use.
For example, you can name it Business Documents, School Work or Personal Files.
After typing the name, press Enter on your keyboard.
Congratulations! You have successfully created a folder on your laptop.
A Faster Way to Create a Folder
There is another method that does not require right-clicking.
Open the location where you want the folder and press these three keys together:
Ctrl + Shift + N
A new folder will appear immediately. Type your preferred name and press Enter.
This keyboard shortcut works on Windows 10 and Windows 11.

How to Put Files Inside Your New Folder
Creating a folder is only the first step. You may also want to move documents, pictures or other files into it.
To do this, locate the file you want to move.
Right-click on the file and select Cut.
Next, open the folder you created, right-click inside it and select Paste.
Your file will now be inside the folder.
You can also copy a file instead of cutting it if you want to keep the original in its previous location.
How to Rename a Folder
If you later decide to change the folder’s name, you do not need to delete it and create another one.
Simply right-click on the folder and select Rename.
Type the new name and press Enter.
Final Thoughts
Creating folders is a simple but important computer skill. Once you understand how it works, you can organise your files more effectively and spend less time searching for documents.
Whether you are a student, business owner, job seeker or office worker, learning how to manage files and folders will make using your laptop much easier.
Submit a Press Release | Advertise With Fresh News | Contact Us